
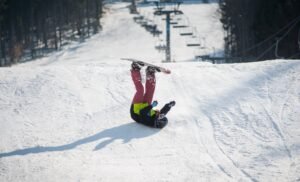
Welcome to the most brutally honest guide on snowboarding you’ll ever read. This isn’t coming from someone who’s been shredding since they were 4 years old and had bones made of rubber and can’t remember a single thing about actually learning. Nah, this guide is written by someone who picked up snowboarding just two years ago—as a 33-year-old woman.
I can still vividly remember the first time I caught my front edge and wondered what kind of devilish snow spatula had just flipped my entire body like an unsuspecting pancake. If you’re here for the real, unfiltered advice on what to expect, what gear to get, and how to survive your first few days on the slopes, then you’re in the right place.
Despite the initial body-flipping, I eventually got completely hooked. I’ve been snowboarding over 100 times since that first terrifying day (okay – days). So, let’s get into it—starting with how to choose the right snowboard for beginners.
Choosing the Right Snowboard
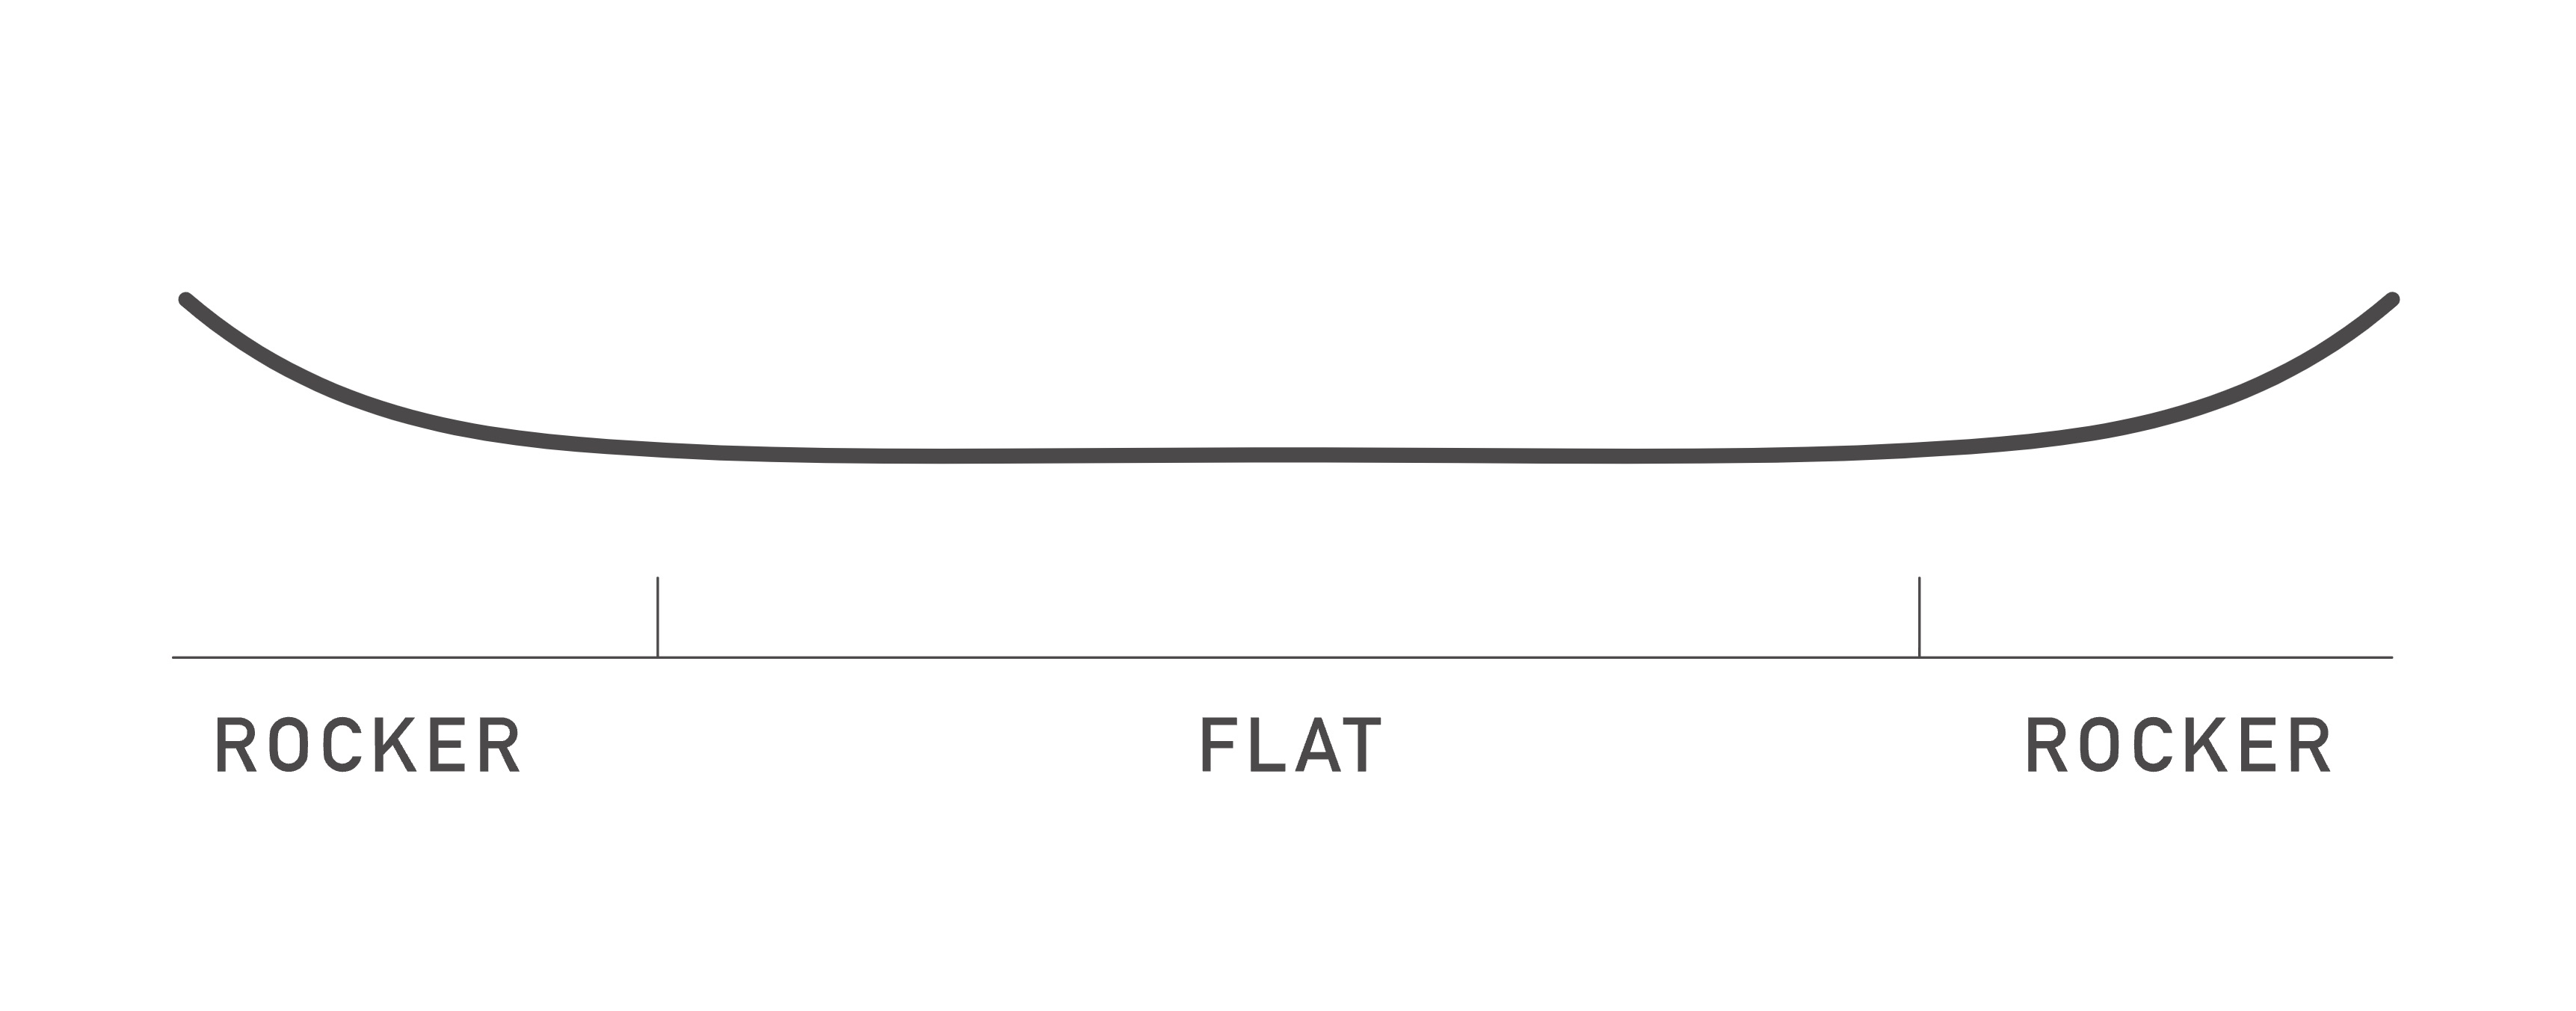
Shape: Flat to Rocker Profile
Snowboards come in all shapes and sizes, but as a beginner, here’s what you need to know: get a flat-to-rocker board. A flat board means if you lay it on the ground, there’s no space between the board and the ground—it sits flat. Rocker refers to the way the sides of the board curve up toward the tip and tail, creating a more forgiving ride. It looks just like the image you’ll see below.
Why do you want this? Because it’s less “grabby” and more forgiving when you make those inevitable mistakes. And believe me, forgiveness is key when you’re learning to snowboard.
Stiffness: Go Soft
Every board has a firmness rating, and you want something soft and playful. A softer board is less responsive, meaning when you screw up—and you will—the board won’t immediately react, giving you that crucial split second to correct yourself.
Size: It’s About Weight, Not Height
Snowboard size is based on your weight, not your height. Seriously, just check the manufacturer’s label. For new riders, I recommend erring on the side of a slightly smaller board—it’s easier to maneuver and less likely to catch an edge.
Heads Up: Your Beginner Board Won’t Last You Long
Here’s the annoying part: once you start getting the hang of snowboarding, you’ll probably want a board with more bite and responsiveness. So don’t be tempted to buy a board you can “grow into”—it’ll make your learning process miserable. Start with a beginner board (they’re usually cheaper anyway), and upgrade when you’re ready. My first board was a K2 First Lite, and it was awesome…until I had to upgrade halfway through my first season. Thankfully, the resale value was pretty good, and I didn’t lose much money on it.

Boots and Bindings for Beginner Snowboarders
Boots: Soft and Comfy
Just like with your board, you want your boots to be on the softer side. My first pair were Burton Lime Lites with double boas. If you don’t know, boas are like the laces of the future—no tying, just twist a dial, and you’re good to go. I wouldn’t buy anything else.
Bindings: Affordable and Forgiving
For bindings, I went with Salomon Rhythm Bindings because they were affordable and did the job. Like your board and boots, softer bindings will give you a little more wiggle room to make mistakes without your board instantly reacting.

Setting Your Board & Bindings Up
Finding Out Which Foot Is Dominant
Now that you have your board you need to figure out which foot will go front. This is an easy test but sometimes your brain will play tricks on you. Have someone stand behind you and give you a gentle push. Whichever foot steps forward is your dominant foot. This foot will go forward on your board.
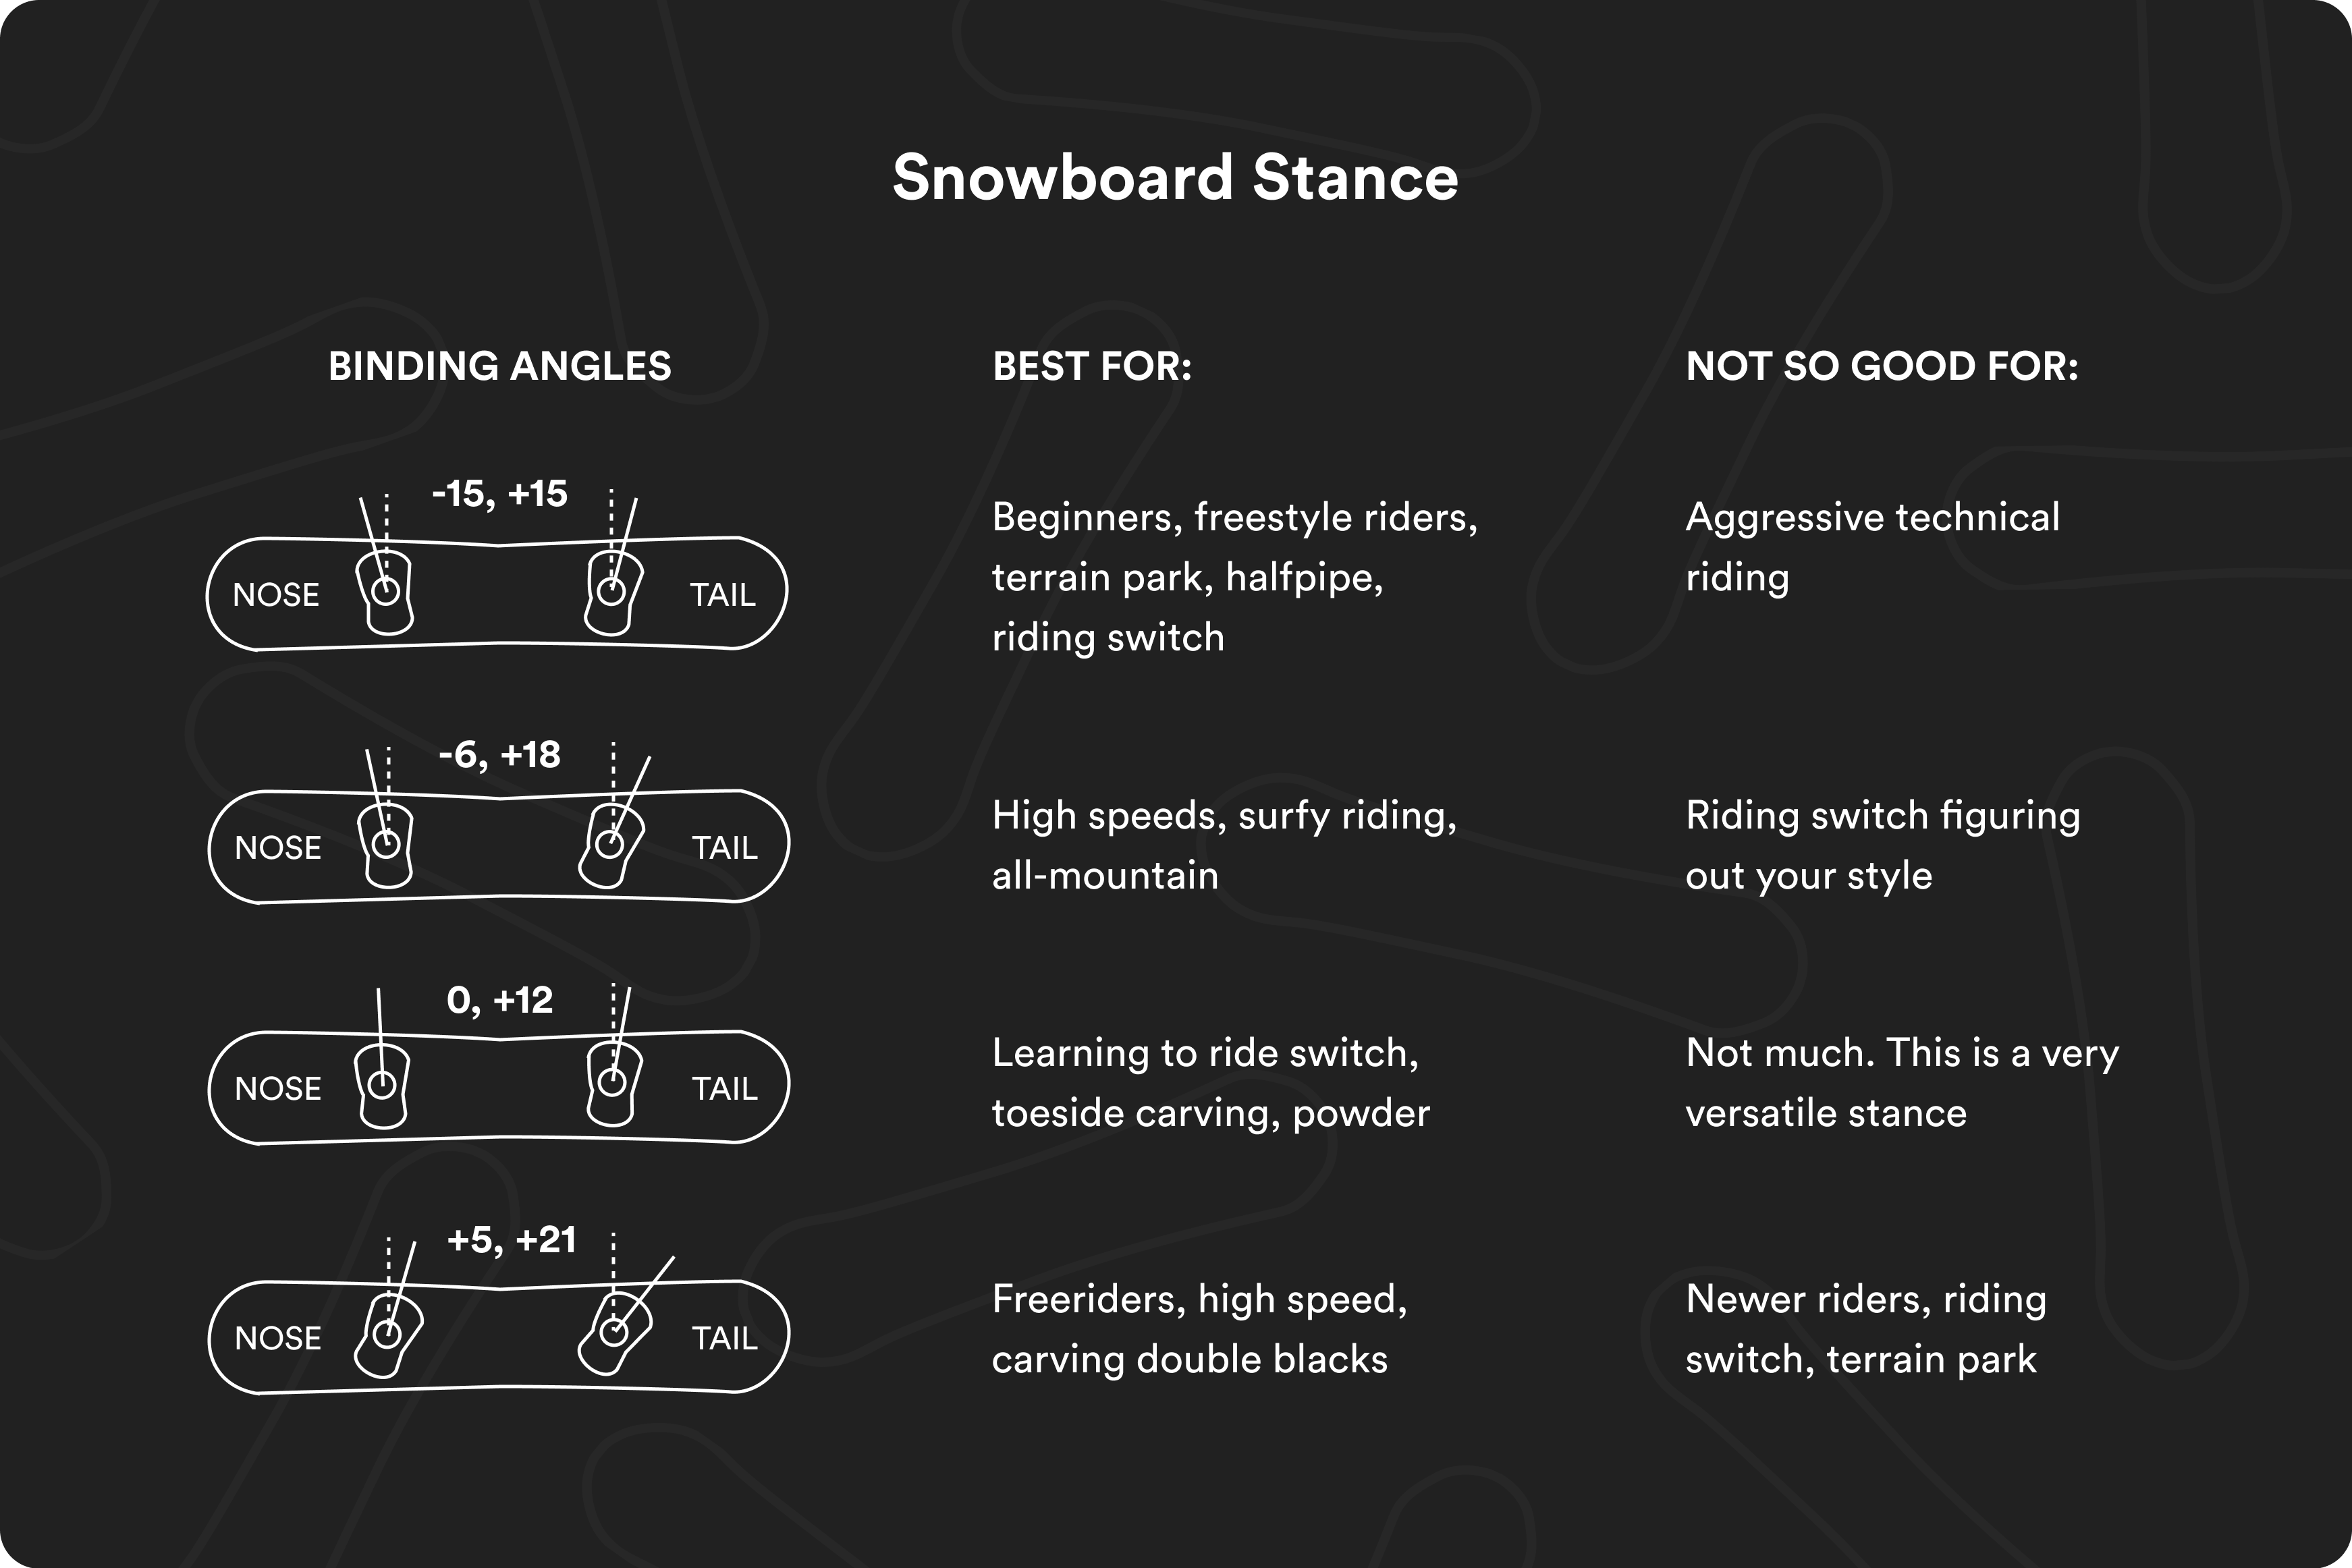
Setting Your Bindings: Start with a “Duck” Stance at 15 and 15 Degrees
Alright, now that you’ve got your board sorted, let’s talk about setting up your bindings. For your first day or so, you’ll want to start in a “duck” stance—this means setting both bindings at 15 degrees, one facing forward and one backward.
Why? Because this setup helps you figure out which foot should be forward. Think of it like brushing your teeth with your non-dominant hand—if it feels awkward, you’ve got the wrong foot forward. Trust me, you’ll just know when it feels right.
Once you’ve got that sorted, I recommend turning your back foot forward by a couple of degrees. It makes initiating your turns a bit easier when you’re just starting out. As you get more comfortable, you might find yourself going back to the full duck stance, but those extra degrees can really help when you’re learning.
Snowboard Gear for Beginners
Finding the Right Balance: Don’t Cheap Out, But Don’t Splurge Either
Your first year of snowboarding will be hard on your gear. It’s going to take a beating and might deteriorate faster than you’d like. But, cheap gear that doesn’t keep you warm or isn’t breathable can make your experience downright miserable. You need stuff that’s warm, breathable, and waterproof.
That doesn’t mean you need a $1000 snow kit. My advice? Look for gear made with Gore-Tex. It’s waterproof and breathable—exactly what you need. Volcom offers some of the best bang for your buck. It’s a bit more affordable than brands like Burton or Arc’teryx, but still high quality.
Snowboard Mitts Vs. Gloves: Your Fingers Will Thank You
I’m a fan of mitts instead of gloves. When I say gloves, I mean the ones where your fingers are altogether. I find these keep my fingers warmer when they are sharing a heat source. However, I buy mitts that have a glove liner in the inside. Which is awesome when you need to take your glove off to fix your bindings or grab a selfie.
The next thing to look for is if they have goggle wipers. For real. One thumb will have a little squeegy, the other will have a stickier wipe material. Those are for wiping your goggles. You’ll thank me later.
My pick – Dakine Gore-Tex gloves. They’ve survived two seasons of heavy use and are still going strong.

Socks: The Real MVP
This might sound dramatic, but socks are the most important part of snowboarding. Don’t even think about using hiking socks or sports socks—get real snowboard socks. I’m super picky about my socks, and after trying a ton, I’ve found that quick-drying socks are the way to go. I’m not a fan of merino wool, despite what everyone says. They just get too soggy and dry too slowly. My go-to is 686 snowboard socks, but they’re currently sold out. Keep an eye out for them, though—they’re worth it.
Snowboard Layering for Beginners
Layering: The Cold, Hard Truth
Here’s a controversial take: layering is overrated (keep reading). IMO the people who are “always cold” are often wearing too much and can’t breathe! So they are holding in a ton of sweat. This isn’t always the case – sometimes people just dress insufficiently. However, too many layers aren’t helpful.
Personally, I stick to a base layer and a shell jacket. That’s it. For pants, I prefer insulated bibs with just shorts underneath. It’s way easier than dealing with base layer pants tucked into your boots. Too much stuff pressing against my legs drives me nuts after a long day on the slopes.
And remember, I’m talking from the perspective of someone who lives in Canada—in the Canadian Rockies, no less. It gets cold here, but even in the harshest conditions, this setup works for me.

How to Get the Best Snowboard Passes
Plan Ahead to Save Cash
Snowboarding isn’t cheap, but with a little planning, you can save some serious money on lift tickets. Buying passes on the resort is going to cost you. Instead, look for passes that offer free days or consider a season pass if you live near a resort.
Season passes are a big investment, but they’re worth it if you want to progress quickly. I opted for a mid-week pass because I have a flexible schedule, and it was pretty affordable.
Lessons: Don’t Skip Them
Take the lesson. Seriously. Your first 10 days on a snowboard can be fast-tracked by taking a lesson. Sure, it’s an investment, but you’re already in deep—why not make it worth your while? What took me 14 days to learn could have been done in one or two lessons.
Your boyfriend, husband, wife, or buddy might have the best intentions, but they probably have bad habits that won’t help you. Instructors, on the other hand, are trained to help you succeed quickly and efficiently.
Be Easy On Yourself
Let’s be real—you’re not 8 years old anymore. You’re not made of rubber, and you’ve got a fully developed frontal lobe that now comprehends consequences. You don’t bounce back as fast, and you probably have a whole list of adult responsibilities. Meanwhile, my friends bring their 10-year-old kids out, and these little rascals pick it up in 30 seconds, while it took me 14 tries just to kinda-sorta link my turns.
The point is, everyone learns at their own pace, and if you take it too seriously, you’re going to miss out on some of the best laughs and good times. Trust me, most people who get too caught up in their own heads end up quitting because their ego can’t handle it. So, seriously—have fun and embrace the ridiculous moments. There’s nothing more hilarious (and humbling) than watching a grown adult faceplant into a pile of powder.
Wrapping It Up: Snowboarding Is Worth It
Learning to snowboard as an adult is tough, but it’s also incredibly rewarding. Once you figure out this abomination of the human body, it’s a blast. I can’t imagine where I’d be today without snowboarding. It’s more than just a sport—it’s a way of life. And hey, if I can get addicted to it at 33, so can you.
Now go out there, get the right gear, take a lesson, and prepare to become a snowboarding addict. You’ve got this!